How To Make A resume in 2023 | Create Resume
What is a Resume?
Resumes tell the employer about your experiences, skills and work history. Use your resume to highlight items that indicate you are a good worker, are qualified for the position and bring desirable skills to the job. If you are a student and have little or no previous job experiences, enhance information about your school and community activities.
A resume can be defined as a document that is prepared and used by a person to showcase their background skills, and achievements. Usage of a resume can be for different reasons but the primary reason to prepare a resume is to establish new employment. A typical resume can be defined as a wherein brief description of the applicable job experience and information about the educational information is mentioned in detail. It also includes a cover letter and an application letter of employment which helps the potential employer to screen the number of applicants which is also followed by a one-to-one interview.
How To Make a Resume Using HTML & CSS Only
Important Key Elements of a Resume
Personal Information
Objective
Education
Work and Related Experience
Awards and Honors
Activities/Hobbies
Skills
Other Considerations
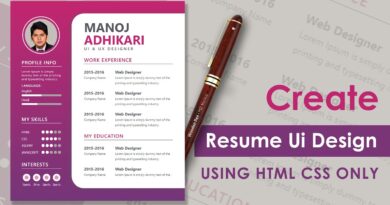
In this article I Will teach you how to make attractive resume design using html and CSS. I will provide you all source code in this article. when you go to interview the first impression is how to looks your resume in seeing. all things your resume is properly manage or not. when your resume is ok then your first impression is very good. so, in this article I will teach you how to make a creative and unique resume design using html and CSS only.
so, let’s start our project. first step you can make a folder that name is blue-resume. you can change name according to your need. then you make two another’s folder inside of blue-resume folder. first one is CSS folder and second one is image folder. CSS folder contain all CSS file. and image folder contain all image file. after then you can copy the below code your html document.
Top 10 Resume Templates in 2022
HTML Code
<!DOCTYPE html>
<html>
<head>
	<title>Resume Design</title>
	<link rel="preconnect" href="https://fonts.googleapis.com">
<link rel="preconnect" href="https://fonts.gstatic.com" crossorigin>
<link href="https://fonts.googleapis.com/css2?family=Oswald:wght@500&display=swap" rel="stylesheet">
	<link rel="stylesheet" type="text/css" href="css/style.css">
</head>
<body>

	<main>
		<div class="left-side">
			<br/>
			<div class="content">
				<h3>Address</h3>
				<p>2132 London, United Kingdom</p>
			</div>
			<br/>
			<img src="image/user.jpg" width="100%" class="profile-img"/>
			<div class="content">
				<h2>CONTACT</h2>
				<h4>Phone</h4>
				<p>+232-3434-2334</p>
				<h4>Email</h4>
				<p>demo@123gmail.com</p>
				<h4>Website</h4>
				<p>www.m-softtech.in</p>
			</div>

			<div class="content">
				<h2>REFERENCE</h2>
				<h4>Abhinav Sukla</h4>
				<p>Director | M-SoftTech<br/>
				T: +3334-3484-3223</p>
			</div>

			<div class="content">
				<h2>HOBBIES</h2>
				<ul>
					<li><img src="image/tr.png"><span>Travel</span></li>
					<li><img src="image/mu.png"><span>Music</span></li>
					<li><img src="image/wr.png"><span>Writing</span></li>
					<li><img src="image/ch.png"><span>Chess</span></li>
				</ul>
			</div>
			<br/><br/>
		</div>
		<div class="right-side">
			<div class="rightside-content">
				<h1>MANOJ <br/><strong>ADHIKARI</strong></h1>
				<p class="para">FRONTEND DEVELOPER</p>
				<br/><br/>
				<h2>ABOUT ME</h2>
				<p class="para1">Lorem Ipsum Is Simply Dummy Text Of The Printing And Typesetting Industry. Lorem Ipsum Has Been The Industry's Standard Dummy </p>
				<br/>
				<h2>EDUCATION</h2>
				<h4 class="sub-heading">SENIOUR FRONTEND DEVELOPER</h4>
				<p class="para1">Lorem Ipsum Is Simply Dummy Text Of The Printing And Typesetting Industry</p>

				<h4 class="sub-heading">SENIOUR FRONTEND DEVELOPER</h4>
				<p class="para1">Lorem Ipsum Is Simply Dummy Text Of The Printing And Typesetting Industry</p>
				<br/>

				<h2>EXPERIENCE</h2>
				<h4 class="sub-heading">SENIOUR FRONTEND DEVELOPER</h4>
				<p class="para2"><span>Present</span> Frontend Developer / Noida</p>
				<p class="para1">Lorem Ipsum Is Simply Dummy Text Of The Printing And Typesetting</p>

				<h4 class="sub-heading"> FRONTEND DEVELOPER</h4>
				<p class="para2"><span>2018-2022</span> Frontend Developer / New Delhi</p>
				<p class="para1">Lorem Ipsum Is Simply Dummy Text Of The Printing And Typesetting</p>

				<br/>

				<h2>EXPERTISE</h2>
				<ul class="ex">
					<li><img src="image/e1.png"></li>
					<li><img src="image/e2.png"></li>
					<li><img src="image/e3.png"></li>
					<li><img src="image/e4.png"></li>
				</ul>
			</div>
		</div>

		<div class="clearfix"></div>
	</main>

</body>
</html>
Copy the css code in below
CSS Code
:root{
	--main-color:#db5326;
	--secondary-color:#22222d;
	--gray:#ebebeb;
	--darkgray:#c2c2c2;
	--white:#fff;
	--lightblack:#4e4e4e;
	--heading-font:'Oswald', sans-serif;
	--normal-font:system-ui;
}

body{
	background: var(--darkgray);
	font-family: var(--normal-font)
}
main{
	width: 100%;
	max-width: 800px;
	margin: 0 auto;
	height: 100%;
	background: var(--white);
	box-shadow: 5px 21px 19px 4px #0c0c0c57;
}
.clearfix{clear: both;}
.content{padding: 20px;}
h3{margin: 0px; color: var(--main-color); font-weight: 500;}
.content p{margin: 0px; font-size: 14px; margin-top: 5px;}
.left-side{margin-left: 50px; width: 260px; float: left;
background: var(--gray); height: 100%;}
.right-side{width: 490px; float: left;}
.profile-img{border-top: 15px solid var(--main-color);
border-bottom: 15px solid var(--main-color);}
h2{font-family: var(--heading-font); margin-top: 10px; letter-spacing: 3px; font-weight: 200;}
h4{margin: 0px; color: var(--lightblack); margin-top: 10px;}
ul{margin-left: -40px; margin-bottom: 40px;}
ul li{list-style: none; float: left; position: relative;}
ul li img{width: 40px; padding-right: 15px;}
ul li span{position: absolute; bottom: -12px; left: 5px; font-size: 11px;}
.rightside-content{padding: 50px;}
h1{font-size: 50px; font-family: var(--normal-font); font-weight: normal;
letter-spacing: 2px; position: relative; margin-top: 10px;}
h1::after{
	content: "";
	height: 2px;
	width: 100px;
	position: absolute;
	background: var(--main-color);
	bottom: -10px;
	left: 0;
}
.para{
	letter-spacing: 3px;
	font-family: var(--normal-font);
	font-size: 17px;
	margin-top: -10px;
}
.para1{
	font-size: 13px;
	letter-spacing: 1px;
}
.sub-heading{
	font-weight: 400;
	letter-spacing: 1px;
	font-family: system-ui;
}
.para2{font-size: 13px; font-weight: 500;}
.para2 span{
	background: var(--main-color);
	padding: 3px 10px;
	border-radius: 6px;
	color: white;
	margin-right: 5px;
	font-size: 12px;
}
.ex{margin-left: -40px; margin-bottom: 40px;}
.ex li{list-style-type: none; float: left; position: relative;}
.ex li img{width: 75px; padding-right: 20px;}
if you have any confusion Comment below or you can contact us by filling out our contact us.
YOU MIGHT ALSO LIKE
How To Create A Website Using HTML And CSS Step By Step Website Tutorial
How to make a dashboard Design Using html CSS
If you have any problem to understand this code you can watch also video tutorial