How to Make dynamic form add and delete rows in table through form in Angular.
Hello viewer, welcome to m-softttech. Today I will teach you how to dynamically add and delete rows in table through form in angular. So let’s start our article.
Step-1
We create a new project
Ng g new dashboard
Step-2
We install bootstrap in our project
npm install –save bootstrap
Step-3
Then we install ngx-toaster
npm i ngx-toastr
Step-4
Then we install browser animation module
Npm install @angular/animation
How To Make Angular filter by multiple properties
Step-5
We create a component that’s name is adduser component
Import these module in app.module.ts file
import { ReactiveFormsModule } from ‘@angular/forms’;
import { AdduserComponent } from ‘./adduser/adduser.component’;
import { BrowserAnimationsModule } from ‘@angular/platform-browser/animations’;
import { ToastrModule } from ‘ngx-toastr’;
Here is app.module.ts file code
import { NgModule } from '@angular/core';
import { BrowserModule } from '@angular/platform-browser';

import { AppRoutingModule } from './app-routing.module';
import { AppComponent } from './app.component';
import { HeaderComponent } from './shared-component/header/header.component';
import { FooterComponent } from './shared-component/footer/footer.component';
import { ReactiveFormsModule } from '@angular/forms';
import { AdduserComponent } from './adduser/adduser.component';
import { BrowserAnimationsModule } from '@angular/platform-browser/animations';
import { ToastrModule } from 'ngx-toastr';

@NgModule({
  declarations: [
    AppComponent,
    HeaderComponent,
    FooterComponent,
    AdduserComponent
  ],
  imports: [
    BrowserModule,
    AppRoutingModule,
    ReactiveFormsModule,
    BrowserAnimationsModule,
    ToastrModule.forRoot({
      closeButton: true,
      timeOut: 2000, // 2 seconds
      progressBar: true,
    }),

  ],
  providers: [],
  bootstrap: [AppComponent]
})
export class AppModule { }
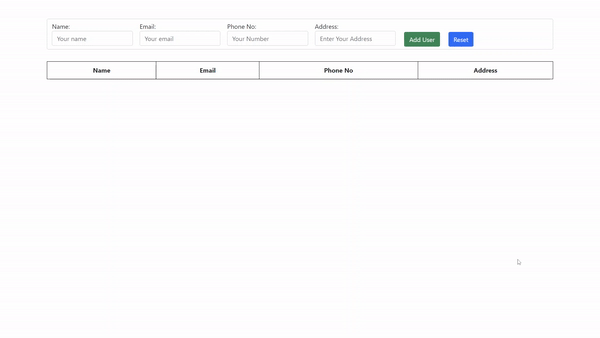
then we create a form in adduser.component.html file
here is the code of adduser.component file
<div class="container">
<form [formGroup]="myForm" class="form-group" >
<div class="form-control">
<label>
Name:
<input formControlName="name" placeholder="Your name" class="form-control">
<div>
</div>
</label>
<label>
Email:
<input formControlName="email" placeholder="Your email" class="form-control">
</label>
<label>
Phone No:
<input formControlName="number" placeholder="Your Number" class="form-control">
</label>
<label>
Address:
<input formControlName="address" placeholder="Enter Your Address" class="form-control">
</label>
<button type="button" class="btn btn-success" (click)="adduser()" >Add User</button>
<button type="button" class="btn btn-primary" (click)="reset()">Reset</button>
</div>
</form>
<table cellpadding="10px" cellspacing="2px" border="1">
<tr>
<th>Name</th>
<th>Email</th>
<th>Phone No</th>
<th>Address</th>
</tr>
<tr *ngFor="let data of formdata">
<td [contentEditable]="contentEditable">{{data.name}}</td>
<td [contentEditable]="contentEditable">{{data.email}}</td>
<td [contentEditable]="contentEditable">{{data.number}}</td>
<td [contentEditable]="contentEditable">{{data.address}}</td>
<td><button type="button" class="btn btn-danger" (click)="removedata(data)">Remove Data</button>
<button type="button" class="btn btn-success" (click)="editdata()">edit</button>
</td>
</tr>
</table>
</div>
Then we create a table. the table store our form data input value and display that.
then we work on adduser.ts file. we create lots of function to manipulate our data. these function are listed below
adduser(){}
reset(){}
removedata(){}
editdata(){}
How to Fetch Data From an API Using Angular – Making a GET Request
then we import formbulider formgroup toasterservice
if you don’t know why we are using toastr service then i will explain you why we are using toastr service. toastr service create a toastr notification for adding a new user and remove a user in table.
here is code of adduser.ts file
import { Component, OnInit } from '@angular/core';
import { FormBuilder, FormGroup,  } from '@angular/forms';
import { ToastrService } from 'ngx-toastr';
;

@Component({
  selector: 'app-adduser',
  templateUrl: './adduser.component.html',
  styleUrls: ['./adduser.component.css']
})
export class AdduserComponent implements OnInit {
 formdata:any;
 username:any;
 public contentEditable: boolean = false;

  myForm:FormGroup | any;
  constructor( private _fb:FormBuilder, private toastrService: ToastrService) {
    this.myForm = this._fb.group({
      name: [''],
      email: [''],
      number: [''],
      address:['']
    });
   }

   sendata(myForm:FormGroup){

   }

  ngOnInit(): void {
    this.formdata=[];
  }


  public showSuccess(): void {
    this.toastrService.success(this.username, 'Sucessfully Added!');
  }

  public showError(): void {
    this.toastrService.error('Data Deleted', 'Sucessfully');
  }


  adduser(){
    this.username=this.myForm.value.name;
    this.showSuccess();
    this.formdata.push(this.myForm.value);
    this.myForm.reset();
  }

  reset(){
    this.myForm.reset();
  }

  removedata(data:any){
    this.showError();
    this.formdata.forEach((value: any, index: any) => {
      if(value == data)
      this.formdata.splice(index,1);

    })

  }

  editdata() : void{
    this.contentEditable = true;
  }


}
Here is final output our project